Sending and receiving data between browser tabs with BroadcastChannel
Security researcher | Technical writer
In this guide I’ll show you how you can send messages between browser tabs just like this:
BroadcastChannel only allows you to communicate between tabs in the same browser, on the same system, and the same origin. And it also allows you to communicate between browser contexts — just like the animation above.
In this article, I'll go into more detail on the BroadcastChannel API and I'll show you how to use it to communicate between browser contexts.
What is BroadcastChannel?
BroadcastChannel is an object that allows different browsing contexts — tabs, iframes, windows, frames — and workers to communicate with each other through a channel. When you initialize a BroadcastChannel object, you must pass in a string to its argument. This string represents the channel that the BroadcastChannel object should be subscribed to.
For example
const counter = new BroadcastChannel("counter");
const messages = new BroadcastChannel("messages");
You can use any name for the channel.
The above are examples of two BroadcastChannel objects subscribed to different channels. The examples show how broadcast channels are initialized.
When the object is initialized, you can send objects, strings, or any other similar type of data to another BroadcastChannel in another browser context that is subscribed to the same channel. The only other thing you should know is that messages will only be sent to other objects in the same origin — URL protocol, host, and port (if applicable) — on the same computer system.
https://google.com and http://127.0.0.1:8080 are two examples of URLs with different origins. http://127.0.0.1:8080/search and http://127.0.0.1:8080/dashboard are two URLs with the same origin because the hostname, port, and protocol are the same. The route isn’t part of the URL’s origin.
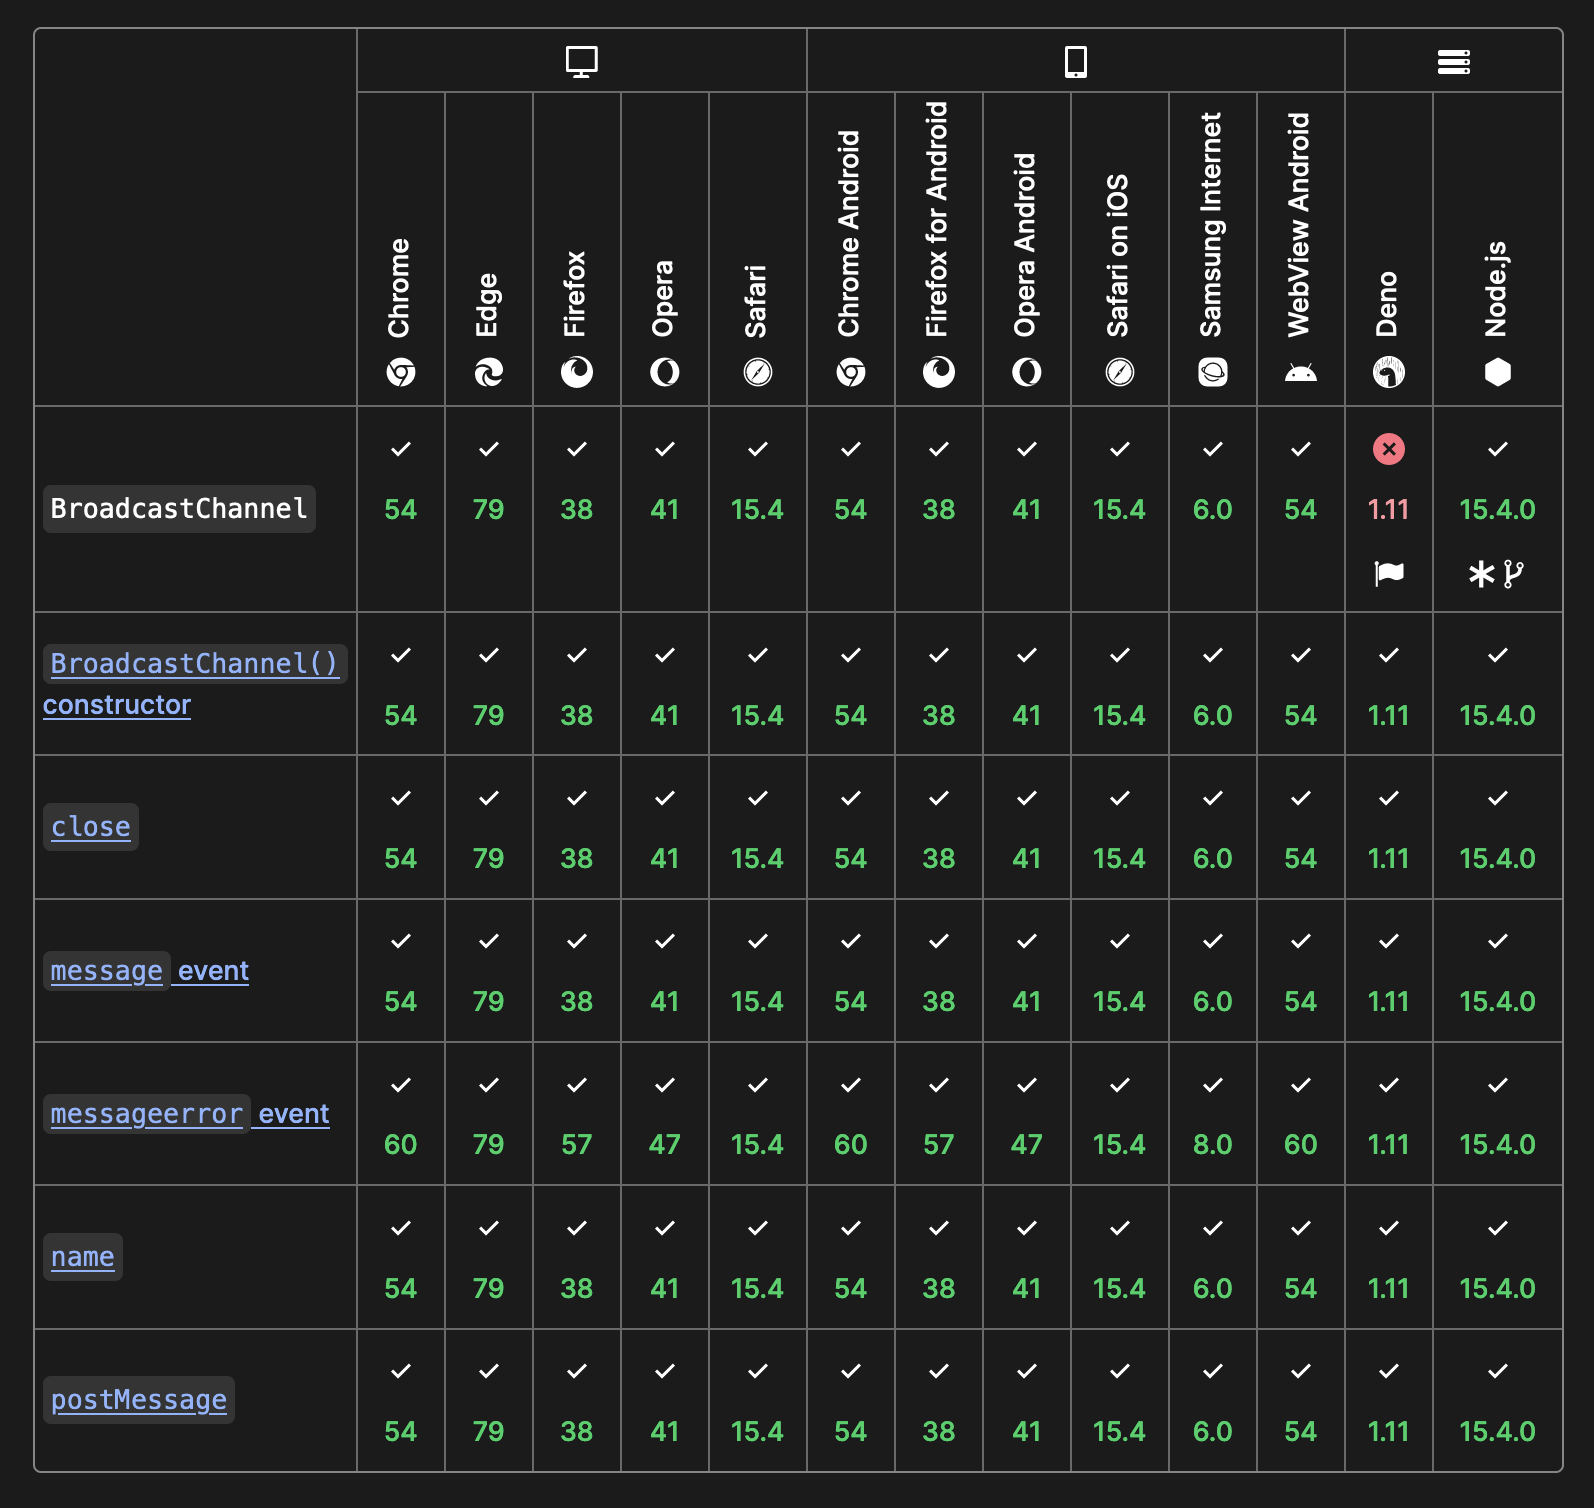
The BrowserChannel API is supported by all major browsers. You won’t have any issues using it if you’re running an updated major browser.
How to send and receive data between browser contexts
For sending data through a channel to other objects, a BroadcastChannel object comes with a .postMessage method. You pass the data (either object, string, number, or similar types) you want to transmit as an argument to the method. For example,
channel.postMessage("This is not goodbye, I'm just saying hello differently");
You don’t need to worry about serializing your data for transmission because the object does it for you using the structured clone algorithm. If you don’t know what the structured clone algorithm is, it is a program that copies objects and transfers data internally. This algorithm has its limitations however, It can copy every part of an object except functions, DOM nodes, and certain object properties such as the prototype chain, property descriptors, setters, getters, and similar metadata-like features.
On the other end, to receive messages, you need to set up a message event listener for the BroadcastChannel object. For example:
channel.onmessage = e => {
    console.log( e.data );
}

// Or

addEventListener("message", (event) => {
    console.log( e.data );
})
The object you transmitted through the channel is serialized before getting transmitted and only the parts of the object that is cloned are deserialized before triggering the message event listener.
When a BroadcastChannel object sends a message, every other BroadcastChannel object subscribed to the channel receives the message. The object that sent the message doesn't receive the message.
Simple example application
In this section, I’ll walk you through building this page:
Step 1: Preparing your files
To build your app you need to create index.html and script.js files. And then connect them. After creating the files, add this line to the index.html file:
<script src="script.js" defer></script>
Step 2: Writing the UI
Looking at the animation above, there are only four components that you need to write:
The input field for collecting data you want to send
The button for sending the collected data
The “Received text:” text
The area just after the “Received text:” text that displays the received message
So, let’s work on those. Add these lines to the index.html file:
<input type="text" id="messageInput"> <!-- the input field -->
<button id="sendButton">Send</button> <!-- The send button -->
<div>
    Received text: <span id="text"></span>
    <!-- “Received text:” and the space right after it -->
</div>
Step 3: Writing the script
For this step, I’ll walk you through building the script step by step.
First, you need to get all the necessary DOM references — the area for displaying the received message, the input element, and the send button:
const text = document.getElementById("text");
const messageInput = document.getElementById("messageInput");
const sendButton = document.getElementById("sendButton");
Next, initialize the BroadcastChannel object:
const channel = new BroadcastChannel("messages");
This channel will be subscribed to a channel called "messages".
After that, set up the message event listener so that you can handle incoming messages:
channel.onmessage = e => {
  text.innerHTML = e.data;
}
This event listener writes the message to the area we made for displaying received messages.
Finally, set up a click event for the send button to send the data from the input element to the channel when the user clicks it.
sendButton.onclick = () => {
  channel.postMessage(messageInput.value);
};
Conclusion
If you built the project, you can now serve it through the local host to see it work. Open the page in two or more browser contexts and see how you send messages from one context to the other, or from one to multiple.
If you just came for the knowledge, I hope this article has given you what you need to know, and also in an easily digestible manner.